In the simplest King and Pawn endings, where you or your opponent have only the King and one Pawn against a bare King, there are simple strategies you must know to guarantee that your Pawn will be able to promote. In this article we’ll learn about the Rook Pawn’s critical square.
Review of Critical Squares
As I’ve mentioned in other articles, the best way to make sure your Pawn will reach the promotion square is to get your King out in front of your Pawn. The King in front of the pawn acts as a guard and escort, preventing the enemy King from blocking the way or capturing the defenseless Pawn.
The place to put your King is on one of the Pawn’s so-called critical squares. Those critical squares vary in their location, depending, of course, on the location of the Pawn in question.
For most of the Pawns, the critical squares are the three squares that stand two squares ahead of the Pawn on the same file as the Pawn or one file to either side. For the Rook Pawn (a Pawn standing on the a- or h-file), the critical square that guarantees promotion is very different.
(Many endgame rules are quite different when applied to Rook Pawns as compared to the other Pawns. This critical square rule illustrates how remarkably different Rook Pawns can behave from the other Pawns.)
Before we look at the critical square for the Rook Pawn and see it work in practice, there are a couple of general rules you should know about Rook Pawns.
- If Black (the defending side) can get his King in front of the Rook Pawn — i.e., on any square on the Rook file that the Pawn has not yet crossed — the game is a draw. The defending King just shuttles up and down on the file (always remaining on the file the Pawn is on), and there’s nothing White can do to win the game.
- The square of the Pawn applies to the Rook Pawn in exactly the same way as the other Pawns. If the defending King is outside the “square of the Pawn,” don’t worry about critical squares, just push the Pawn as fast as it will go. You’ll win.
The Critical Square for Winning with a Rook Pawn
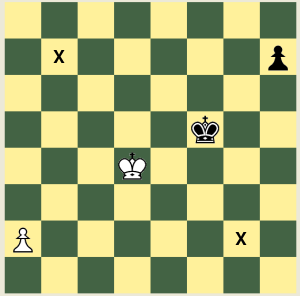
 The critical square for a Rook Pawn is in the adjacent file at the 7th rank, i.e. b7 for the a-pawn or g7 for the h-pawn. From Black’s perspective, the critical square would be either b2 or g2. In the diagram at left, the critical square for White’s Pawn is b7, while the critical square for Black’s Pawn is g2.
This critical square rule reflects the much more difficult task the attacking player has in winning with a Rook Pawn. You can figure that you must have a much more dominating position to win with a Rook Pawn than would be the case with other Pawns. Another way to put this is that King and Pawn endings involving a Rook Pawn tend to be much more likely to end in a draw.
The reason for this is that there is no maneuvering room on one side of the Pawn. Consequently the defender’s task is usually much simpler.
An Example of Winning with a Rook Pawn
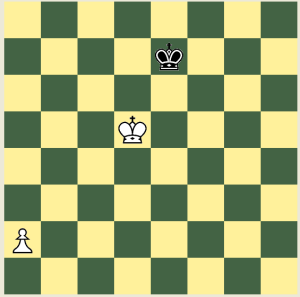
Here is an excellent example of the application of the rule. White has — remarkably — only one move that will allow him to win the game.
- Kc6! …
The only move that allows White to reach the critical square b7! If White had played, say, 1.Kc5?, then Black counters with 1…Kd7! White can now make any move and Black will respond with 2…Kc8, and White will never be able to reach the critical square (and White has blundered away his chance to win). I’ll have more on this aspect of the problem in a following post.
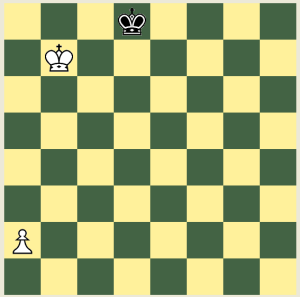
- … Kd8
- Kb7! …
Notice how the White King is perfectly situated to block the Black King out and to guard the Pawn as it approaches the promotion square. Again, this is the only move to win. If White had played 2.Kb6?, Black draws with 2…Kc8!
- … Kd7
- a4 Kd6
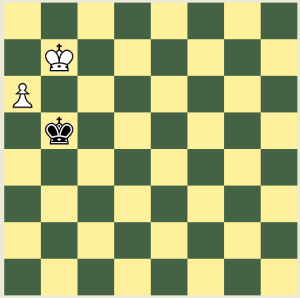
- a5 Kc5
- a6 Kb5
The White King has very effectively kept Black out of the action!
- a7 Kb4
And the Pawn will promote to a Queen on the next move.
Here is a short list of rules for you to remember in this ending and those like it:
- Remember the square of the pawn. If the King can’t catch the Pawn, just push it.
- If you’re defending against a King and Rook Pawn, urgently try to get your King on the file in front of the Pawn.
- If you’re the attacker, urgently try to get your King to the Pawn’s critical square (always keeping in mind your Pawn’s safety).
I hope you can use this rule to win more great chess games!


