
Trap your opponent in the corner using your rook and knight!
The checkmate with rook and knight against a king comes up fairly often, but most beginners don’t know it, and even some fairly strong players either don’t know it well or miss it easily. So it’s a good pattern to know. You can rescue games (as I have) knowing this pattern.
The rook and knight mate pattern

Your knight
Notice that the knight stands on f6, a square that is on the diagonal that leads to the corner square, with one square between the knight and the corner square. Put another way, to reproduce the pattern, the knight should stand on c3, c6, f3, or f6.
The enemy king
The enemy king must be on the corner square. Very often you can set up this pattern by moving your knight to the f6 square (or one of the other squares mentioned above) while the king stands in the corner. Other times, you may be able to force the king to move to the corner.
Your rook
The rook will often be on the seventh rank, checking the enemy king from h7. But it might be on the g-file as well, checking from g8. Of course, this pattern could occur on the other side of the board, with the enemy king trapped on a8, or it might occur in the a1 or h1 corners too.
How to set up the checkmate
To set up the checkmate, the opponent must have his king in the corner or in a position where you can drive it into the corner. Place your rook to cut off the king’s escape on either the seventh rank or the g file. Then maneuver your knight to the f6 square (or the comparable square for one of the other corners).
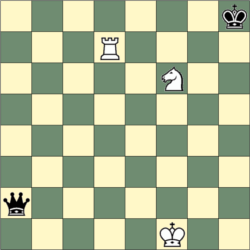
Notice that in this position the enemy king is trapped: he can’t make a move. The rook guards the square that stands between your knight and the enemy king, and the knight guards the other two squares around the king. This locks the enemy king in the corner, preventing him from escaping. Trapping the enemy king like this is often referred to as making (or weaving) a “mating net.” This net is particularly strong, and can be very tricky to defend against, once it is properly set up.
The checkmate
Checkmate is delivered by moving the rook to the checking square that stands immediately next to the king. In the diagram, mate is delivered by moving the rook to h7.
Important clues!
This checkmate will occur most often on the seventh rank (your opponent’s “pawn row”) or on the g-file when your opponent has castled on the kingside (“castled short“). You should look for this checkmate idea when you have a rook and a knight available for attack and your opponent is vulnerable on the seventh rank or the g-file. It can, of course, occur on the b-file as well, but it occurs more often on the kingside of the board.
This will come up most often in the late middle-game or early endgame, or in the course of a direct attack against the enemy king, which of course can occur at any point of the game. This mate will rarely, if ever, occur in the opening.
Example game
In the following diagrammed position, from one of my own games, Black has just moved his pawn to c6. Is this a good move? What should White play next?
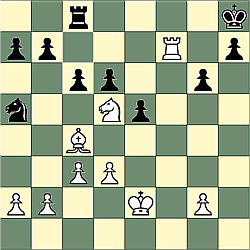
No, 1…c6 is not a good move. White’s next move is 2.Nf6!, and White will be able to checkmate Black in 2 more moves. Black can try:
- 2…Rc7
- 3.Rxc7
And now Black can make any move, and White will respond with 4.Rh7, checkmate.
Notice that Black has no way to defend against this checkmate. That’s one of the nice things about this pattern: having established the setup, it can be very difficult to defend against.
Quiz
Finally, here’s a somewhat tricky position testing your grasp of this checkmate pattern. It’s White’s move … and it’s a good thing, because Black is threatening …Qe1 checkmate.
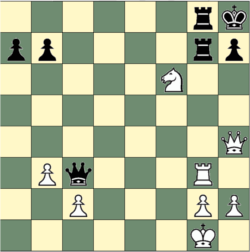
But White gets to move first! So your challenge is to find White’s proper course of play. Click here to see the answer.
In the example one game I am not understanding the symbols NF6?
Can’t the Knight move up one square thus eliminating the pawn on D6 and move to 2 squares to eliminate the other pawn.
Estelle
In the Example Game, why doesn’t 2…Bxf7 break the attack?
I enjoyed this little lesson. Never had seen this pattern before. Thanks.
white to play
Qhx7! – check
black – Rhx7
white – Rgx8
checkmate